Showing posts with label diy. Show all posts

Monday, August 20, 2012

The Power of Spray Paint


Pinned Image

Pinned Image

Pinned Image

Pinned Image

Pinned Image

I love how spray paint can make just about anything fresh and new again. I especially love it when used in unexpected ways, like to turn a cuckoo clock into a modern piece of art or to upcycle mismatched bottles into uniform vases.

Jeff and I use spray paint on home decor projects all the time (lamps and small furniture), but these images have inspired me to look for a few more things I can transform (I have an ornate mirror and a set of antlers that may be geting facelifts soon).

What other things might look better spray painted?

Images: Chandeliers, Clock, Antlers, Bottles, Toys, Mirror

Wednesday, April 18, 2012

Tied Up in Knots

Living at the lake, I've always had a love for anchors and knots. Here are some of my favorite knotty things.

DIY knot decoration

Pretty top knot

Sailing bracelet

Oxford in a knot

Knot Nesting Rings
Knot stacking rings

TAUPE Large sailor knot headband
Sailor knot headband

Tuesday, March 27, 2012

Painted Wooden Spoons


I don't even own one wooden spoon, but if I had lots of them, I'd paint them like these. They'd be so pretty sticking up out of a utensil crock, don't you think? And, they'd make a fun housewarming gift (bundled in new dish towels and wrapped in ribbon).

Read more about the DIY project on Little Bit Funky.

Image via.

Monday, January 16, 2012

DIY Valentine Card


I'm starting to get excited about Valentine's Day, and am gathering ideas for sweet gift ideas (Pinterest makes that soooo easy).

Normally for Valentine's Day, I'll stand in the card aisle trying to find a pretty card with the perfect message ... and then I get home and have to try to write something that's as lovely as the rest of it. Instead of that, this year I'd like to make my own card and put a little extra love into it. My favorite idea so far is this "Heartstrings" card from Martha Stewart.

Get the full how-to here.

Wednesday, January 4, 2012

Organizing the Linen Closet

550_100862930


January is a great time to get reorganized and the linen closet seems like an easy place to start. To start, we got rid of old towels and linens we weren't using, now I'd like to find a home for toilet paper, cleaning products and other things that get tossed in there. I like how the above closets use labeled containers or baskets to put those things in. I also like the towel rods installed on the inside of the closet door. It's a good place to hang linens that you don't want to get wrinkly, like table cloths and runners.

The linen closet in our master bath doesn't have a door so I used a tension rod and a cheap curtain to hide the mess that's back there. The funny thing is, every time I give a tour of our house, people look behind it ... so much for my genius mess-hiding curtain. At least now I have some inspiration on how to get our linen closet in shape. Maybe I won't be so embarrassed the next time someone looks back there.

Photos via HomeGoods and Deliciously Organized.

Tuesday, January 3, 2012

DIY Ornament Storage

I'll be honest, I'm not quite ready to take down my christmas decorations. The house looks so bare after they come down, and I have to come to the realization that my favorite time of year is over. Maybe I'll take them down in the next week or two. That will give me time to make a better system for storing ornaments. Here's a genius idea from Design a la Mod.

Get the full how-to here.

Tuesday, December 27, 2011

Cloudy Outlook

First, let me get this out of the way - I'm not pregnant, nor am I planning to be for a while. But, if I were decorating a nursery, I'd be thinking seriously about adding in some happy little clouds (yes, that was a Bob Ross reference). These little fluffy puffies are adorable, and if you're crafty, you can save money by sewing some up yourself.

Here are a few of my favorite little cloud items.


1. Mobile    2. Garland    3. Pillows    4. Crib bedding    5. Print

Thursday, December 22, 2011

Thrifty Thursday - Silhouette Artwork


Using small but heavy items, you can create lovely pop art for just a few dollars.

Pick out your items, and choose the color spray paint you want. Arrange your items on a piece of paper board, and sweep over them with the spray paint until you get the look you want. Let it dry, then frame it. I think this also would work well on a canvas.

Get the full how-to from Better Homes and Gardens here.

Photos via BHG.

Tuesday, November 29, 2011

Simple Grocery Bag Storage

2010 05 27_4239


I love this idea for a quick way to help organize under the sink. If you're like me, you save way too many plastic grocery bags. If there's ever a shortage, I'd be able to supply one for every household. Unfortunately, that massive supply is exploding from underneath my sink. This recycled coffee can idea is a super inexpensive way to solve the problem.

With some spray paint, a knife and some scissors, you can get that bag disaster under control. Now I just have to get through a big can of coffee.

Get the full how-to here.

Thursday, November 17, 2011

Thrifty Thursday - The tale of the home haircut


When we were dating, Jeff and I would go get haircuts each month. Usually I'd get
mine colored, too. Without even thinking, we were spending over $120 a month on hair!

For the wedding, I decided to grow my hair out. I got a few trims the year we were engaged, and after a few (not-so-great) home dye jobs, I found a home hair color that worked for me. My hair bill went from $1000/year to less than $150 a year. Much better!

Jeff was still getting monthly hair cuts. Recently, he bought a $25 haircut kit and trusted me to cut his hair. Mistake? Maybe.

The first time I cut his hair, we set up the "barber shop" on the deck. I was really uncomfortable with the clippers in my hand. I felt like one of the pranksters on Jackass going up behind someone and buzzing a big bald spot on their head. It was awkward. The clippers were heavy. I was so scared I was going to mess up.

I almost made it through the first haircut - it wasn't looking too bad. Then, something terrible happened. I may or may not have accidentally taken a big chunk of hair off the back of his head (I did). You may or may not have been able to see his scalp (you could). I messed up.

He took it pretty well, I think. We laughed a lot, he may have secretly cried - I'm not sure. I tried to blend the bald spot in, and really, it wasn't the worst thing ever, but the blending made the rest of his hair very very short. The next day at work, his co-workers were asking when he joined the military. They called him sargeant (I can't blame them, it was pretty high and tight).

Luckily his hair grew fast, and he's fully recovered now. I think we're up to three home hair cuts and have already saved $50! I'm getting a little better each time - figuring out the right attachments, blending with scissors - I'm practically a professional. Well, maybe that's a stretch, but I'm getting there. In the long run, having me learn to cut his hair will save us about $300 a year!

Photo via.

Wednesday, November 9, 2011

Twig Coasters


I love these handmade twig coasters from Martha Stewart. Wouldn't
they be great for a Thanksgiving table? Using the same idea, you could
make matching placemats! And, wouldn't they be pretty wrapped around
a glass candle holder as a centerpiece? I could even see spray painting
them to match your decor. Keep them natural at Thanksgiving, then
spray paint them red, silver or gold to use at Christmas.

Get the how-to here.

Wednesday, October 19, 2011

Chocolate Monogram Placeholders

What better way to mark a reserved place setting than with chocolate? These cute chocolate monogram placeholders could be used for any event from weddings to birthday parties, maybe even Thanksgiving and Christmas!


Spotted on Oh Happy Day. Get the full how-to here.

Tuesday, October 11, 2011

DIY Glitter Boots


My grandma taught me to love glitter and other pretty things. I'm sure she would go crazy for these glitter shoes for grown ups. They're perfect for dressing up a casual outfit and great for colder weather. The best part is that you can make them yourself!  


Get the full how-to here.

(Photos via Le Fanciulle)

Tuesday, September 27, 2011

Pumpkin Decorating Ideas

Last week I was thumbing through the October issue of Country Living magazine and was inspired by their fun Halloween/pumpkin decorating ideas.

As much as I hate to admit it, I’m one of those people who decorates for holidays too early. I just get excited and can’t help myself. I'm trying really hard to wait until Oct. 1 to put pumpkins on my patio. I guess it gives me time to plan which of these beauties I'll decorate with this year.


These gilded gourds and pumpkins make me swoon (top) (bottom).


Black and white pumpkins! I’m in love. Get the how-to here.


This bookshelf pumpkin tree made my jaw drop.

This decoupage pumpkin is genius.

See more of Country Living’s pumpkin decorating ideas here.

(photos via countryliving.com)

Thursday, September 15, 2011

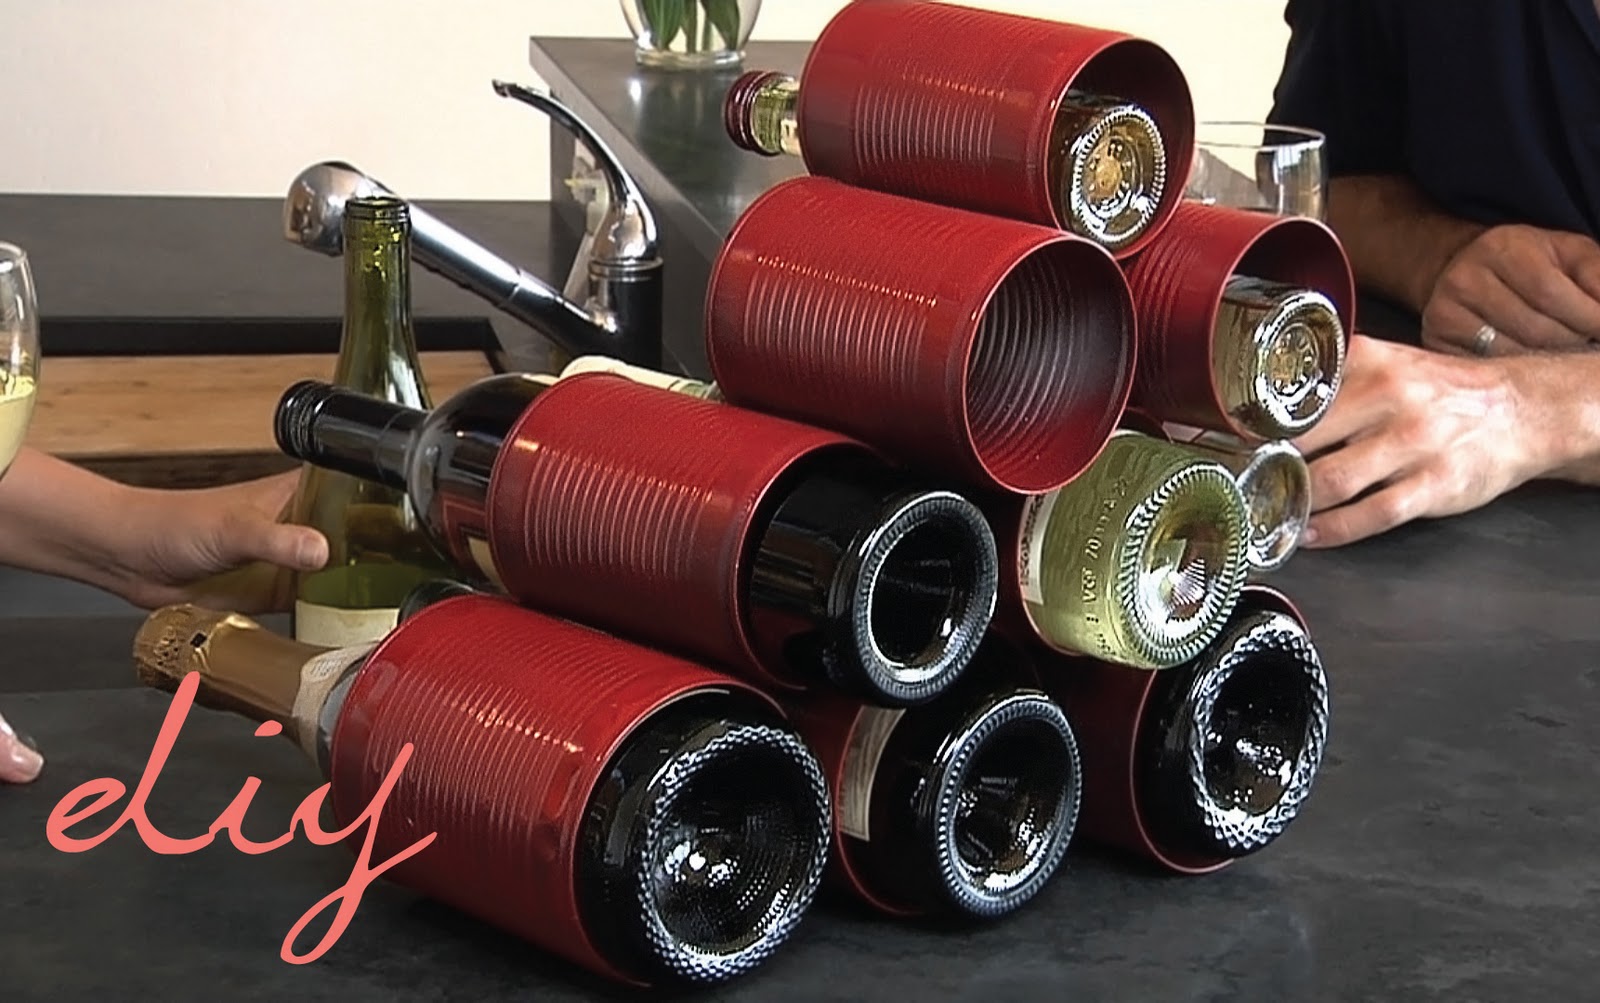
Genius Wine Rack


I love a good do-it-yourself project, and this is too cool (and easy!) to pass up. I love that the design options are endless. It can be painted and repainted to always match your kitchen's color scheme. I'm going to start collecting cans!

Get the full how-to from Michelle Kaufmann's blog here.

(Photo via Michelle Kaufmann)